Introduction to Rabab
Pakhair (Welcome),
 Starting with a bit of my introduction, I am an engineer
graduated from GIKI currently working at Engro Corporation. Besides my business
card introduction, I am an avid photographer, a wanderlust traveller and a
melting heart for art.
I started playing the Rabab a few months back and felt a
lack of tutorials, videos and articles on the internet despite being in the 21st
century. Efforts to spread its audience and increase the knowledge base haven’t
been put in place as the west did for their instruments like the guitar, the
drums or the piano. In this regard I’ll be sharing my knowledge to give a heads-up for the new-comers.
The first part is recognizing the strings and tuning them.
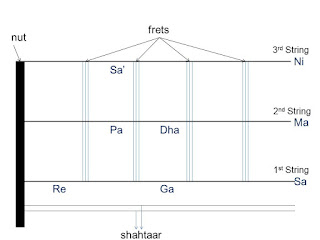
Remember, there is no standard tuning for Rabab such as the EADGBE in the
guitar, but there are a few rules for tuning.
 |
| Figure 1: Strings and Surrs |
 |
| Figure 2: Strings on the Rabab |
If you hold the Rabab in the playing position the top most
string corresponds to the 1st string in the above fret board. The
yellow lines are the “Shahtaar” while
the red lines are the main strings.
You can use an app tuner like “DaTuner Lite” to tune your
strings to the appropriate note. The tuning of the shahtaars and the other 13
or 15 strings called “buchi” (blue strings
in below picture) will be done at a later stage.
This is it for the strings and its tuning on the Rabab. In
the next blog I’ll share the first lesson and some good practices when playing
the Rabab. I’ll also clear the Surrs present in Figure 1 above.
One thing I have learnt during my journey into the Rabab is
that it requires patience, a lot of patience. You can’t just start playing Game
of Thrones theme song or Qarara Rasha on the first go, but a practice time of 6
months will start revealing results and you will like it!
Till next time.
Khuday Pa Amaan (May God keep you in peace)!


Comments
Post a Comment