The First Lesson
Pakhair!
I hope you have got familiar with the strings, the structure
of the Rabab and its tuning. If not, do not hesitate to contact me for any
clarity.
Let’s move on to the first lesson on the Rabab.
 |
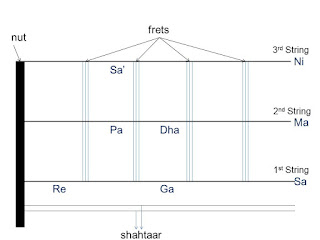
| Figure 1: Surrs placement on the fret board |
There are 7 Surrs or notes in the Rabab. They are Sa Re Ga Ma Pa Dha Ni. They are
distributed on the fret board as following:
1st String Open
|
Sa
|
1st String 1st Fret
|
Re
|
1st String 3rd Fret
|
Ga
|
2nd String Open
|
Ma
|
2nd String 2nd Fret
|
Pa
|
2nd String 3rd Fret
|
Dha
|
3rd String Open
|
Ni
|
3rd String 2nd Fret
|
Sa’
|
After the Ni note, the surrs start again with Sa. The colon on the Sa
indicates that it is the same note as the 1st string open but one
octave higher than it. Similarly if you go deep down on the 3rd
string the notes will be as following:
3rd String 3rd Fret
|
Re’
|
3rd String 5th Fret
|
Ga’
|
3rd String 7th Fret
|
Ma’
|
Mostly there are no marks for the
5th fret and onwards but you can accurately check the note by moving
the finger, strumming the string while a tuner is showing the frequency as you
move the finger. In this way you can find the exact point where the note should
be played.
The first lesson is very simple by
its look but holds utmost importance in playing the Rabab like a pro. All you
have to do is strum one by one each surr from Sa till Sa’ and again in
the reverse order. So it would go like Sa
Re Ga Ma Pa Dha Ni Sa’ Ni Dha Pa Ma Ga Re Sa.
You have to practice this like
1000 times to get your fingers going and make a map of the fret board in your
mind. There are some tips, which if followed, will help you a lot in the
future. These are:
- Go slow but hit the string hard to make a solid sound
- Assign one finger for each fret i.e. use the index finger for the first fret on all three strings, the middle finger for the second fret, the ring finger for the third fret and the pinky finger for the fourth and fifth fret.
- Use a metronome to keep your timing and rhythm intact
- As you practice the first lesson, say the surr while strumming it to make a memory of the fret board.
The more you practice this lesson,
the easier will be for you to play in the later stages.
I would like to appreciate Ali Qazi here. He has been an amazing mentor and a high-spirited teacher. I have
not met him due to long distance but he made it sure to transfer the knowledge
as accurately as possible. I have learnt everything from him and these tutorials are dedicated to him.
Khuday pa amaan!

Comments
Post a Comment