Posts

The Third Lesson

Pakhair! The first two lessons were the basics. You need to be really good at them to progress further and start making music as you feel like. It will also help you identify notes when listening to a particular tune and replay it on your own. Moving to the third lesson in the series, it is a kind of sequel to the first lesson with some improvisations to provide us with a variety. There are 2 parts to this lesson so I’ll go one by one. The first part consists of playing lesson one with two strums for each note, hence it will go like: SaSa   ReRe   GaGa   MaMa   PaPa   DhaDha   NiNi   Sa’Sa’   NiNi   DhaDHa   PaPa   MaMa   GaGa   ReRe   SaSa The second part improvises on the previous part and introduces three strums for each note like: SaSaSa   ReReRe   GaGaGa   MaMaMa   PaPaPa   DhaDhaDha   NiNiNi   Sa’Sa’Sa’   NiNiNi   DhaDHaDha   PaPaPa   MaM...
The Second Lesson

Image
Hey! How does the sweet taang  feel like! You must be comfortable moving your fingers around the fret board like it’s your playground. Today we’ll start the second lesson and it is a raag. The melodious sound and a rhythm will start to form from this lesson on. Let’s tune the rabab and get on with the lesson. The Surrs  of this lesson will go like this: Sa Re Ga Re Ga Ma Ga Ma Pa Ma Pa Dha Pa Dha Ni Dha Ni Sa’ Ni Sa’ Re’ Re’ Sa’ Ni Sa’Ni Dha Ni Dha Pa Dha Pa Ma Pa Ma Ga Ma Ga Re Ga Re Sa Figure1: Surrs on the fret board I’ll repeat here again to go slow but hard. It’s not the speed but the sound that matters. Pace will follow up by itself. Now practice this as much as you can. As a wise man once said “Practice makes a man perfect!” The link to the practical tutorial of this lesson is given below. Rabab Lesson#2 See you next time!

The First Lesson

Image
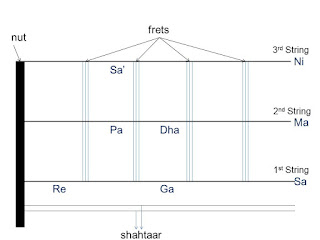
Pakhair! I hope you have got familiar with the strings, the structure of the Rabab and its tuning. If not, do not hesitate to contact me for any clarity. Let’s move on to the first lesson on the Rabab. Figure 1: Surrs placement on the fret board There are 7 Surrs or notes in the Rabab. They are Sa Re Ga Ma Pa Dha Ni . They are distributed on the fret board as following: 1 st String Open Sa 1 st String 1 st Fret Re 1 st String 3 rd Fret Ga 2 nd String Open Ma 2 nd String 2 nd Fret Pa 2 nd String 3 rd Fret Dha 3 rd String Open Ni 3 rd String 2 nd Fret Sa’ After the Ni note, the surrs start again with Sa. The colon on the Sa indicates that it is the same note as the 1 st string open but one octave higher than it. Similarly if you go deep down on the 3 rd string the notes will be as following: 3 rd String 3 rd Fret Re’ 3 rd St...

Introduction to Rabab

Image
Pakhair (Welcome) , Starting with a bit of my introduction, I am an engineer graduated from GIKI currently working at Engro Corporation. Besides my business card introduction, I am an avid photographer, a wanderlust traveller and a melting heart for art. I started playing the Rabab a few months back and felt a lack of tutorials, videos and articles on the internet despite being in the 21 st century. Efforts to spread its audience and increase the knowledge base haven’t been put in place as the west did for their instruments like the guitar, the drums or the piano. In this regard I’ll be sharing my knowledge to give a heads-up for the new-comers. The first part is recognizing the strings and tuning them. Remember, there is no standard tuning for Rabab such as the EADGBE in the guitar, but there are a few rules for tuning. Figure 1: Strings and Surrs Figure 2: Strings on the Rabab If you hold the Rabab in the playing position the top most string corresponds to the 1 st...