Posts

Showing posts from November, 2017

The Second Lesson

Image
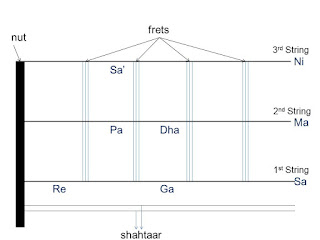
Hey! How does the sweet taang  feel like! You must be comfortable moving your fingers around the fret board like it’s your playground. Today we’ll start the second lesson and it is a raag. The melodious sound and a rhythm will start to form from this lesson on. Let’s tune the rabab and get on with the lesson. The Surrs  of this lesson will go like this: Sa Re Ga Re Ga Ma Ga Ma Pa Ma Pa Dha Pa Dha Ni Dha Ni Sa’ Ni Sa’ Re’ Re’ Sa’ Ni Sa’Ni Dha Ni Dha Pa Dha Pa Ma Pa Ma Ga Ma Ga Re Ga Re Sa Figure1: Surrs on the fret board I’ll repeat here again to go slow but hard. It’s not the speed but the sound that matters. Pace will follow up by itself. Now practice this as much as you can. As a wise man once said “Practice makes a man perfect!” The link to the practical tutorial of this lesson is given below. Rabab Lesson#2 See you next time!

The First Lesson

Image
Pakhair! I hope you have got familiar with the strings, the structure of the Rabab and its tuning. If not, do not hesitate to contact me for any clarity. Let’s move on to the first lesson on the Rabab. Figure 1: Surrs placement on the fret board There are 7 Surrs or notes in the Rabab. They are Sa Re Ga Ma Pa Dha Ni . They are distributed on the fret board as following: 1 st String Open Sa 1 st String 1 st Fret Re 1 st String 3 rd Fret Ga 2 nd String Open Ma 2 nd String 2 nd Fret Pa 2 nd String 3 rd Fret Dha 3 rd String Open Ni 3 rd String 2 nd Fret Sa’ After the Ni note, the surrs start again with Sa. The colon on the Sa indicates that it is the same note as the 1 st string open but one octave higher than it. Similarly if you go deep down on the 3 rd string the notes will be as following: 3 rd String 3 rd Fret Re’ 3 rd St...